Getting Started with SPCWorks Data Correlator

SPCWorks has a built in data correlation software. It can automatically compare data between filtered selections of point results, help to calculate the averaged difference (offsets) between the two sets of data, and update the point offsets within the SPCWorks database (or export them to an ASCII file).

Access to the Correlator

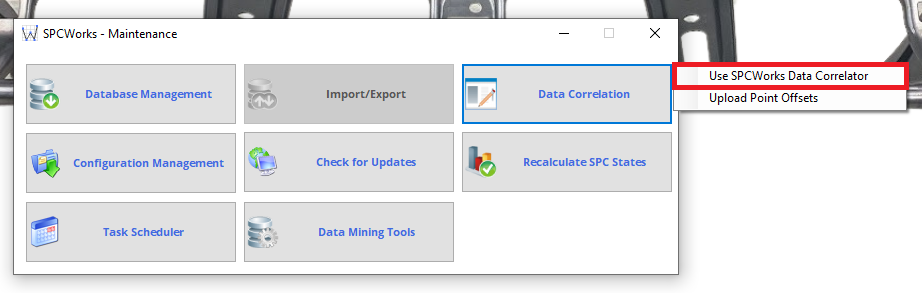
To access the Data Correlation software from SPCWorks, first select Maintenance from the Common Tasks toolbar, then select Use SPCWorks Data Correlation from the Data Correlation button.

_images/UseSPCWorksDataCorrelator.png

When Selected, the user will have the Splash Screen appear. Wait for the software to open.

_images/SplashScreen.png

When the software has fully loaded, the taskbar located at the top of the window contains the following options:

_images/TaskBar.png

New Correlation Project: Reset the current correlation project and start from the beginning.

Load Correlation Project: Load a previously configured and saved correlation project.

Save Correlation Project: Save the current project configuration.

View Logs: View log messages.

About: Displays the “About” screen.

Step 1: Select Databases

In order for the data to be correlated, two databases need connected. The target Database and the Reference Database. These two databases will contain the cycle info and point data needed to correlate.

_images/01.png

FMS Database: The Target database where the offsets will be applied to.

CMM Database: The Reference Database (i.e. SWLKReader) that is compared to the Target Database

Driver Management: In Driver Management, setup and configure any file parser drivers (i.e. SWLKReader)

Backup FMS Database: Use Backup Target Database to backup the data in the Target Database before applying the offsets.

Important

Before applying a data correlation the database should be backed up in the event the end results are poor.

Select Next to go to the next step.

Step 2: Select the FMS and CMM Parts

Both databases from step 1 should contain the part that are to be correlated. Select both the FMS and CMM parts.

_images/02.png

Part: Using the drop down boxes, choose the parts from the target and reference databases that you wish to correlate.

Details: Shows a list of points in the selected part.

_images/Details.png

Select Next to go to the next step, or Back to go to the previous step.

Step 3: Point Selection

Correlation will require that the data in both the Target and Reference parts be compared one to one. This step will ensure that both sets of data are mapped respectivly.

_images/03.png

FMS: This is a list of currently unmapped points, and their descriptions, from the Target Point and Database

CMM: This is a list of currently unmapped points and their descriptions, from the Reference Point and Database

–>, <– To manually map points to each other, select the points from the Target and Reference lists then press the arrow pointing to the right. To manually un-map points: select the points in the Mapped Points list and press the arrow pointing to the left.

Mapped Points: This is a list of all currently mapped points. These are also the points that will be correlated in subsequent steps.

Auto-Match: Auto map points based on points’ labels.

Note

Point names must be exactly the same (case sensitive) between the Target and Reference lists.

Clear Match: This button clears all points from the Mapped Points box.

Target Data Type: Select the data type(e.g. Raw data)

Reference Data Type: Select the data type (e.g. VF data)

Select Next to go to the next step, or Back to go to the previous step.

Step 4: Cycle Mapping

This screen lists all available measurement cycles that need to be mapped to each other for correlation (i.e. target and reference cycles of the same part).

_images/04.png

FMS: This is a list of currently unmapped cycles, and the date and time they were measured. These cycles are from the Target Database

CMM:This is a list of currently unmapped cycles, and the date and time they were measured. These cycles are from the Reference Database

–>, <–: To manually map cycles onto each other, select a cycle from the Target list and its corresponding cycle from the Reference list and press the arrow pointing to the right. To manually un-map points: select the cycle from the Mapped Cycles list and press the arrow pointing to the left.

Mapped Cycles: This is a list of all currently mapped cycles. The Target and Reference SN is listed for each mapped cycle along with the time that the Target SNcycles were created. These are also the cycles that will be used in the correlation in subsequent steps.

Clear Match: This button clears all cycles from the Mapped Cycles box.

Filter FMS Cycles: The SPCWorks Cycle Filter screen will appear where the desired FMS cycles can be used in the data correlation.

Filter CMM Cycles: The SPCWorks Cycle Filter screen will appear where the desired CMM cycles can be used in the data correlation.

Auto-Match:Click this button to have the Data Correlator automatically map cycles with the same SN.

Select Next to go to the next step, or Back to go to the previous step.

Step 5: Review Results

Chart displays every axis individually in the point to show the difference between the FMS and CMM data. It also shows how much its varying between the cycles

_images/05.png

Difference Results: Select a point to preview the chart results in the Display.

Display Description: Shows the description for each point in the chart.

Print: Allows the results in the chart or display to be printed with a printer or to a PDF file.

Preview Offsets: Shows a summary of the offset results based on the correlation results.

_images/PreviewOffsets.png

Display: Shows a line graph of the results for the selected point for each cycle.

Note

outliers of FMS data only can be removed from the graph. This will slightly adjust the offset calculations.

Control: Shows the Upper and Lower control limits in the Display.

Spec.: Shows the Upper and Lower Spec limits in the Display.

Select Next to go to the next step, or Back to go to the previous step.

Step 6: Apply or Export Results

A summary window will appear based on the previous steps results. When confirmed the Database Update Screen will appear.

_images/Confirmation.png

_images/06.png

Export to a file: Exports the results to a xml file.

Update Database: Updates the Database with the correlation results.

Important

Once completed, results cannot be reversed unless a backup of the database before the correlation is available.

Clear Log: Clears the logs of all entries.

Select Back to go to the previous step.

This is the final step of the Data Correlator. Once completed the window can be exited by selecting the X button in the top right corner of the window.